If you trust a website but find that some features of the website are not working, perhaps because of high security settings on your computer, you can make an exception by adding the website to the list of trusted websites.
This article shows you how to add a trusted website in Windows 10. This exception applies to all browsers, including the new Microsoft Edge, Google Chrome, Firefox, Internet Explorer, etc.
What is a trusted site?
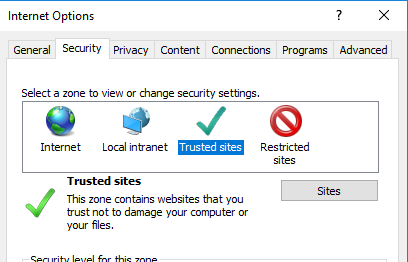
Internet security options offer four different areas. These four areas are:
- Internet
- Local intranet.
- Trusted sites.
- Forbidden sites.
All of these areas have some level of security for the browser and files on your computer.
The default value for the Internet zone is medium to high. If you want to add an exception, you must add the site to the trusted sites area so that your computer can trust the website and override all other security zone settings.
Make a list of trusted sites
The easiest thing to do is to first extract the URLs of the sites you want to add. This way, you can add each list at a time, although you can update the list at any time.
- Enter the full URL in the Add this website to the zone box. For example, you should enter “https://www.parksandassociatesrealty.com” instead of just “www.parksandassociatesrealty.com”. If you forget to use HTTPS, you will get an error message. Tip: If you copy the URL from the address bar of your browser, you can just paste it in.
- Click the Add button. This will move the link to the Sites field below.
- For security reasons, enter (and visit) websites that use HTTPS instead of the HTTP prefix. By using HTTPS, the website has taken steps to add a layer of security. However, if there is a site using HTTP that you really want to add, you will need to uncheck the box below to require server validation for all sites in that area. If you do not disable this option, you will see the same error message informing you that all websites must use the HTTPS prefix.
- Once you have added all websites to your list, click Close and click OK to exit the Internet properties.
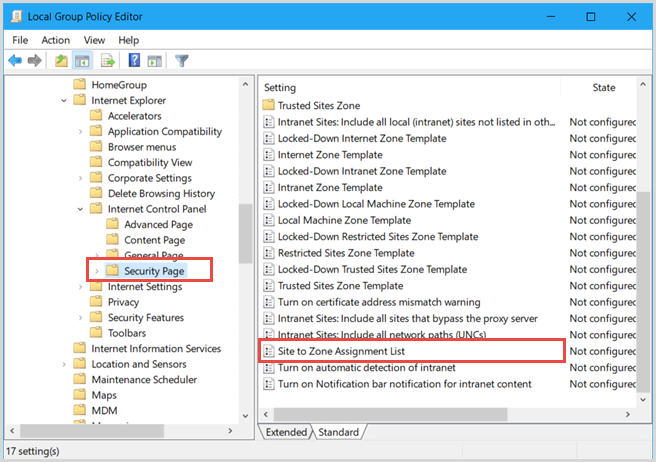
Add a trusted website to Windows 10 Group Policy
Step 1: Press the Windows + R shortcut to open the Run dialog box. Type gpedit.msc in the box and click OK.
Step 2: On the left pane, go to Computer Configuration> Administrative Templates> Windows Components> Internet Explorer> Internet Control Panel> Security Page. In the right pane, double-click Site to Zone Assignment List.
Step 3: In the Site-to-Site Assignment List window, select Enabled and under Options, click Show.
Step 4: Enter a website in the Value Name column. Then enter 2 in the box next to it.
Tips: Internet Explorer has four security zones, from one to four in each. To add a trusted site to Group Policy, we need to select number 2.
1: Intranet zone
2: Trusted sites zone
3: Internet zone
4: Restricted Sites Zone
Step 5: Go back to the “From Site to Zone Assignment List” window, click “Apply”, then click “OK”.
Step 6: After completing the steps above, go to your desktop and see if the addition was successful or not. Click the search box and type Internet Explorer. Click Enter, it will open immediately.
Step 7: Click on the gear icon in the upper right corner and select Internet Explorer Properties.
Step 8: Click the Security tab, click Secure Sites, and then click Sites.
Step 9: The Trusted Sites dialog box displays the trusted site added to Group Policy.
It is important that you and your family are safe when you visit websites. Using a shared computer and allowing certain trusted sites with HTTPS and a higher level of Internet security can protect potentially dangerous sites from children and others from your home. Use common sense and use the “Trusted Sites” feature in Windows.
Want to know if it’s safe to turn off Internet Explorer in Windows 10 because you’re using Microsoft Edge instead? Read our suggestions to turn them off or leave them on.